A hot tub requires regular maintenance and inspection to prevent small problems from becoming big repairs. Items like cleaning filters, balancing water chemistry, and shocking the water help keep your spa performing well.
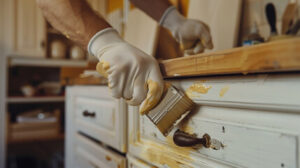
Scratches and cracks are another common problem that should be addressed quickly. A light surface scratch may be covered by warranty, but a deeper gash could reveal the underlying material and void your warranty. Visit Us Here for more information.
Water levels can be affected by a variety of factors, including normal evaporation and splash-out, children using the spa, and spa covers that don’t fit well. However, if the water level drops by more than an inch or two a week, it might be due to an issue that requires professional attention.
Water chemistry is constantly changing, and frequent testing and adjustments are required to manage the water levels of your spa. To make things easier, choose one day of the week to perform these tests and adjust your chemicals. This allows you to keep track of the overall status of your water chemistry and helps prevent a lot of confusion when performing micro-adjustments daily.
The number of people who use your spa can also affect the water quality, and how quickly you might need to bump up your chemicals. Every time a person gets in, they are introducing anything on their skin or hair into the water, and this can affect the pH levels of your spa. If you have a large number of people in the spa at once, it is often necessary to increase your chemical levels more frequently.
When you add a product to treat your water, it is important to close the air valves and let your jets run for at least 20 minutes. This will help ensure the chemicals are fully dissolved and can begin to work. Once the time is up, re-test your spa water and make any additional corrections as needed. This step is crucial to minimizing scale buildup, corrosion of metals, and keeping your sanitizer levels at the ideal range.
Temperature
When the water in your spa is too cold it can be a real pain, but it can also be a sign of a serious problem that needs professional attention. Cold water could indicate a broken heater, or it may be that your heating element is beginning to fail. You can test this by using a voltmeter to see whether you have 240 volts on the heater leads (normally the copper jumper strips connected to the stainless steel tube that houses the heater).
Similarly, if your water level is suddenly dropping, it could be indicative of a leak. This is a more serious issue that will require professional repair services, and you’ll need to act promptly to avoid structural damage.
A common cause of a sudden drop in water level is a broken pump, which can be easy to fix by disconnecting the pump from its filter housing and running it without the filters attached. If this doesn’t fix the issue, it could be that you have a dirty filter that is restricting the flow of water.
Small scratches on your spa shell are normal and usually no reason for concern, but deeper cracks should be repaired as soon as possible to prevent further deterioration. You can repair these with an acrylic shell repair kit, which includes color-matched resin and a soft applicator for filling in the crack.
Regular maintenance of your hot tub will ensure that it’s always ready for a relaxing soak. Be sure to use a clean, secure cover to keep heat in and debris, pets, and other things out, as well as check your water temperature regularly. If you notice any problems, contact your local dealer right away for prompt service and to make sure that your warranty coverage is in effect.
Circulation
Often referred to as the heart of your spa, the circulating pump filters and heats water to ensure clean, warm and comfortable hot tub soaks. It is also responsible for keeping the water moving so that hot spots do not form. This function contributes to decreased bacterial growth in plumbing, reduces spa chemicals and cleaning costs, and makes it easier to remove any floating debris that may be in the water.
If your pump is making an unusual noise or failing to work at all, it’s time to call for a service technician. An experienced technician will be able to determine whether the issue is with your pump or another part of your spa and make the appropriate repairs. If you hear a groaning sound coming from your pump, the most likely culprit is a worn bearing or impeller. A service technician will be able to replace these components, and your spa will be as good as new.
Leaks are the most serious spa problems and require a professional service technician to find and fix them. Attempting to locate and repair a leak without draining the spa can be extremely dangerous, as the water will contain toxins that are unsafe to touch. A trained technician will be able to use tools and supplies designed specifically for this job and will also be able to provide you with a complete guide on how to safely drain your spa and prepare it for a full repair.
A well-rounded maintenance routine greatly decreases the chances of your hot tub encountering any major issues, but they will still happen. It is important to understand what the different systems in your spa are tasked with and how to perform basic troubleshooting, as this can help you save money and avoid costly repairs.
Odd Noises
When a spa is making unusual noises, it’s often a cry for help from its intricate systems. Recognizing these early signals helps to prevent minor hiccups from turning into costly repairs.
For example, a grinding noise during the heating or circulation cycle is typically a sign that a pump bearing or shaft seal is wearing out. These parts are essential to the overall function of your spa’s circulation system, so if you hear this strange sound, it’s important to act quickly to avoid damage.
Other signs that the circulator may need attention include low water pressure and uneven circulation. These symptoms indicate that the pump is struggling to properly agitate the water, which can lead to reduced performance or even a complete failure of the circulator.
It’s also possible that the pump is having trouble with water flow, which can be caused by a variety of factors. Ensure that the drain valve is closed, and check the filter for any debris or clogs. This is an easy fix for most owners, and can be done on a regular basis to help reduce the risk of a problem.
If you’re unable to resolve the issue yourself, it’s always best to consult a professional. Licensed electricians can make the necessary adjustments to ensure your hot tub is safe and operating correctly.
If you’re comfortable working with electrical components, try to disconnect the power to the pump before performing any maintenance. Remember that it’s important to follow proper safety standards and always be aware of the voltage requirements for your specific hot tub, as misjudging this information can lead to a faulty circuit breaker or electrical fire.
Controls
The controls in a spa are responsible for the precise operation of all components, including the heater, circulation system, and jets. When these systems are not functioning properly, a hot tub can feel unresponsive to user input. This issue is particularly common in outdoor installations, where exposure to the elements can accelerate wear and tear on electronic parts. Fortunately, this is also one of the easiest spa repair issues to resolve, often with nothing more than replacement parts.
First, identify the source of the problem. This can be as simple as observing whether water levels drop overnight, a sign that the pump or heater is not working correctly. You can also use a thermometer to check for the correct water temperature, which should be at 104degF or higher. This prevents the machinery from overworking, and it ensures that your body will experience the health benefits associated with warm, therapeutic water.
Once you’ve identified the exact problem, you can begin the process of repairing it. Consult the owner’s manual or manufacturer website to determine the exact replacement parts you will need for your model of hot tub. Make sure to select components that are rated for outdoor use and can withstand the elements. After assembling your new parts, double-check all connections to ensure there are no leaks. In addition, ensure all gaskets and seals are properly seated to protect against moisture intrusion and maintain the integrity of the weatherproofing system.
A little time spent on daily maintenance tasks will keep your wooden hot tub looking and functioning great. Regular surface skimming helps keep debris and contaminants from floating on the surface, while routinely checking the water levels and adjusting chemicals ensures that your hot tub is always in good condition.